

How to Create a DigitalOcean Droplet from an Ubuntu ISO Format Image

Introduction
DigitalOcean’s Custom Images feature allows you to bring your virtual disk images from an on-premise environment or another cloud platform to DigitalOcean and use them to start DigitalOcean Droplets.
As described in the Custom Images documentation, the following image types are supported natively by the Custom Images upload tool:
ISO is another popular image format which you may want to use with Custom Images. ISO images are frequently provided by Linux distributions as a convenient method for installing Linux. Unfortunately, ISO images aren’t currently supported by the upload tool, although support is planned for the end of 2018.
In this tutorial, we’ll demonstrate how to use the free and open-source VirtualBox virtualization tool to create a DigitalOcean-compatible VDI image (VirtualBox Disk Image) from an Ubuntu 18.04 ISO. The steps in this guide can be adapted to work with your preferred distribution’s ISO images.
Prerequisites
Before you begin, you’ll need the following available to you:
- A local machine or remote server (with GUI access) onto which you’ll install and use VirtualBox. In this tutorial we’ll use a Mac OS X local machine, but you can use any system supported by VirtualBox. To learn more about supported systems, consult the VirtualBox Manual. The GUI menu options should be similar across operating systems, but may not be identical.
- An ISO-format Ubuntu 18.04 Server OS image. The
ubuntu-18.04.1-live-server-amd64.isoimage meets the two requirements listed in the Custom Images Image Requirements:- Your image must support the ext3 or ext4 filesystems
- Your image must have
cloud-init0.7.7,cloudbase-init,coreos-cloudinit,iginition, orbsd-cloudinitinstalled (Ubuntu 18.04 Server comes withcloud-initinstalled)
If you’re adapting these steps for another distribution’s ISO and your image does not have cloud-init installed and configured, you must install and configure it manually after installing the OS.
Once you have these prerequisites available to you, you’re ready to begin with this guide.
Step 1 — Installing VirtualBox and Creating a Virtual Machine
The tool we’ll use to convert the ISO-format image in this guide is VirtualBox, a free and open-source virtualizer for x86 hardware. By default, VirtualBox uses a GUI, which we’ll use to create the VDI image in this guide.
To begin, download and install VirtualBox from the downloads page. Follow the appropriate link in the VirtualBox 5.2.20 platform packages section depending on your host operating system. In this guide, we’ll be using an OSX system, so we’ll download and install VirtualBox using the provided DMG.
Once you’ve installed VirtualBox, open the application.
You should see the following welcome screen:

Click on New to begin creating your Ubuntu virtual machine.
The following window should pop up, allowing you to name your virtual machine (VM) and select its OS:

In this tutorial, we’ll name our VM Ubuntu 18.04, but feel free to give the VM a more descriptive name.
For Type, select Linux, and for Version, select Ubuntu (64-bit). Then, hit Continue.
The following screen should appear, allowing you to specify how much memory to allocate to your virtual machine:

Unless you have a more complex use case, 1024 MB should be enough memory for your virtual machine. If you need to adjust memory size, enter the amount of memory to be allocated to the VM, then hit Continue.
You should see the following screen:

This window allows you to create a virtual hard disk for your VM. This virtual hard disk is the image that you’ll upload to DigitalOcean in a later step. The Ubuntu operating system will be installed from the ISO you downloaded to this virtual hard disk. Make sure Create a virtual hard disk now is selected, and hit Create.
The following Hard disk file type window should appear, allowing you to select the format you’d like to use for your image:

All three types are supported by DigitalOcean Custom Images, so unless you have a strong preference, select VDI (VirtualBox Disk Image). Hit Continue.
You should then see the following window:

This window allows you to choose between a Dynamically allocated or Fixed size hard disk file. We’ll use the default Dynamically allocated option and allow the file to grow as we install the Ubuntu OS and packages. Hit Continue.
The next window allows you to name your hard disk file (as well as choose the path to which it will be saved), and specify its maximum size:

Be sure to give yourself enough disk space to install the operating system as well as additional packages you may need. The default 10 GB should be fine for most purposes, but if you anticipate installing a large number of packages or storing a lot of data in the image, you should bump this up to your anticipated disk usage.
Once you’ve selected the size of the virtual hard disk, hit Create.
At this point, you’ll be returned to the initial welcome screen, where you’ll see the virtual machine you just created:

We can now begin installing Ubuntu onto the virtual machine.
Step 2 — Installing Ubuntu 18.04 onto the Virtual Machine
In this step we’ll install and configure the Ubuntu operating system onto our virtual machine.
To begin, from the VirtualBox welcome screen, select your virtual machine, and hit the Start button in the toolbar.
You should see the following virtual machine window, prompting you to select the ISO file from which you’ll boot the system:

Select the Ubuntu 18.04 Server ISO you downloaded, and hit Start.
In the VM, the Ubuntu installer will begin booting from the ISO, and you should be brought to the following menu:

Choose your preferred language using the arrow keys, and hit ENTER to continue.
You should then see the following Keyboard configuration screen:

Choose your preferred keyboard configuration, select Done, and hit ENTER.
Next, you’ll be brought to the following installer selection screen:

Select Install Ubuntu, and hit ENTER.
The following Network connections screen should appear:

This screen allows you to configure the network interfaces for your Ubuntu server. Since we’re performing the installation on a virtual machine, we’ll just use the default option as the configured interface will be overwritten when we launch the image on the DigitalOcean platform.
Select Done and hit ENTER.
You’ll then be brought to the following Configure proxy screen:

If you require a proxy, enter it here. Then, select Done, and hit ENTER.
The next screen will allow you to choose an Ubuntu archive mirror:

Unless you require a specific mirror, the default should be fine here. Select Done and hit ENTER.
Next, you’ll be prompted to partition your virtual disk:

Unless you’d like to set up Logical Volume Manager (LVM) or manually partition the virtual disk, select Use An Entire Disk to use the entire attached virtual disk, and hit ENTER.
The following screen allows you to select the virtual disk that will be partitioned:

As described in the prompt text, the installer will create a partition for the bootloader, and use the remaining virtual disk space to create an ext4 partition to which the Ubuntu OS will be installed.
Select the attached virtual disk and hit ENTER.
The following screen displays a summary of the filesystem installer options before partitioning:

The ext4 partition will be mounted to /, and a second partition (1 MB) will be created for the GRUB bootloader. Once you’ve gone over and confirmed the partitioning scheme for your virtual disk, select Done and hit ENTER.
In the confirmation screen that appears, select Continue and hit ENTER.
The next screen will allow you to configure the system hostname, as well as an Ubuntu user:

Note that as you fill out this screen, the installer will continue copying files to the virtual disk in the background.
In this tutorial, we’ll create a user named sammy and call our server ubuntu. The server name will likely be overwritten when this image is run on the DigitalOcean platform, so feel free to give it a temporary name here.
You can upload your SSH keys to DigitalOcean and automatically embed them into created Droplets, so for now we won’t Import SSH identity. To learn how to upload your SSH keys to DigitalOcean, consult the Droplet Product Documentation.
Once you’ve filled in all the required fields, the prompt should look something like this:

Select Done and hit ENTER.
The next screen will prompt you to select popular snaps for your Ubuntu server. Snaps are prepackaged bundles of software that contain an application, its dependencies, and configuration. To learn more about snaps, consult the Snap Documentation.

In this guide we won’t install any snaps and will manually install packages in a later step. If you’d like to install a snap, select or deselect it using SPACE and scroll down to Done. Then, hit ENTER.
Regardless of your selection in the snap screen, you’ll then be brought to an installation progress and summary screen:

Once the installation completes, select Reboot Now and hit ENTER.
The installer will shut down and prompt you to remove the installation medium (in this case this is the ISO image we selected earlier). In most cases, the ISO will be detached automatically upon reboot, so you can simply hit ENTER.
To double check, in the VirtualBox GUI menu, navigate to Devices, and then Optical Drives. If the Remove disk from virtual drive option is available to you, click on it to detach the ISO from the virtual machine. Then, back in the virtual machine window, hit ENTER.
The system will reboot in the virtual machine, this time from the virtual disk to which we installed Ubuntu.
Since cloud-init is installed by default on Ubuntu 18.04 Server, the first time Ubuntu boots, cloud-init will run and configure itself. In the virtual machine window, you should see some cloud-init log items and have a prompt available to you. Hit ENTER.
You can then log in to your Ubuntu server using the user you created in the installer.
Enter your username and hit ENTER, then enter your password and hit ENTER.
You should now have access to a command prompt, indicating that you’ve successfully completed the Ubuntu 18.04 installation, and are now logged in as the user you created previously.
In the next step of this guide, we’ll reconfigure cloud-init and set it up to run when the Ubuntu image is launched as a Droplet on the DigitalOcean platform.
Step 3 — Reconfiguring cloud-init
Now that we’ve installed Ubuntu 18.04 to a virtual disk and have the system up and running, we need to reconfigure cloud-init to use the appropriate datasource for the DigitalOcean platform. A cloud-init datasource is a source of config data for cloud-init that typically consists of userdata (like shell scripts) or server metadata, like hostname, instance-id, etc. To learn more about cloud-init datasources, consult the official cloud-init docs.
By default, on Ubuntu 18.04, cloud-init configures itself to use the DataSourceNoCloud datasource. This will cause problems when running the image on DigitalOcean, so we need to reconfigure cloud-init to use the ConfigDrive datasource and ensure that cloud-init reruns when the image is launched on DigitalOcean.
To begin, ensure that you’ve started your Ubuntu 18.04 virtual machine and have logged in as the user you created earlier.
From the command line, navigate to the /etc/cloud/cloud.cfg.d directory:
- cd /etc/cloud/cloud.cfg.d
Use the ls command to list the cloud-init config files present in the directory:
- ls
05_logging.cfg 50-curtin-networking.cfg 90_dpkg.cfg curtin-preserve-sources.cfg README
First, delete the 50-curtin-networking.cfg file, which configures networking interfaces for your Ubuntu server. When the image is launched on DigitalOcean, cloud-init will run and reconfigure these interfaces automatically. If this file is not deleted, the DigitalOcean Droplet created from this Ubuntu image will have its interfaces misconfigured and won’t be accessible from the internet.
- sudo rm 50-curtin-networking.cfg
Next, we’ll run dpkg-reconfigure cloud-init to remove the NoCloud datasource, ensuring that cloud-init searches for and finds the ConfigDrive datasource used on DigitalOcean:
- sudo dpkg-reconfigure cloud-init
You should see the following graphical menu:
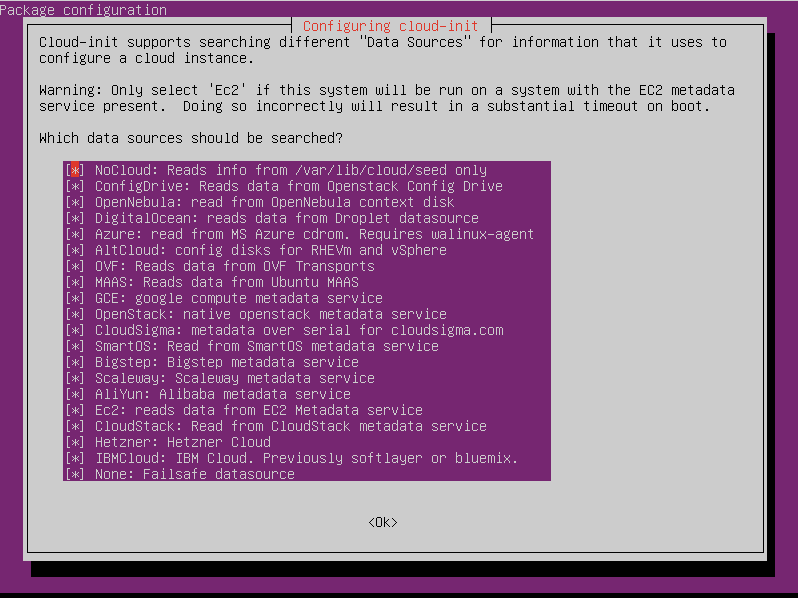
The NoCloud datasource is initially highlighted. Press SPACE to unselect it, then hit ENTER.
Finally, navigate to /etc/netplan:
- cd /etc/netplan
Remove the 50-cloud-init.yaml file (this was generated from the cloud-init networking file we removed earlier):
- sudo rm 50-cloud-init.yaml
The final step is ensuring that we clean up configuration from the initial cloud-init run so that it reruns when the image is launched on DigitalOcean.
To do this, run cloud-init clean:
- sudo cloud-init clean
At this point, your image is ready to be launched on the DigitalOcean platform. You can install additional packages and software into your image. Once you’re done, shutdown your virtual machine:
- sudo shutdown -h now
We can now move on to uploading and launching this custom image on the DigitalOcean platform.
Step 4 — Uploading Custom Image and Creating Droplet
Now that we’ve created an Ubuntu 18.04 VDI image and configured it for use on DigitalOcean, we can upload it using the Custom Images upload tool.
On macOS, the Ubuntu virtual disk image we created and configured will be located by default at ~/VirtualBox VMs/your_VM_name/your_virtual_disk_name.vdi. This path may vary slightly depending on the OS you’re using with VirtualBox.
Before we upload the image, we’ll compress it to speed up the file transfer to DigitalOcean.
On your host OS (not inside the virtual machine), navigate to the directory containing your VDI image file:
- cd ~/VirtualBox\ VMs/Ubuntu\ 18.04/
Now, use gzip to compress the file:
- gzip < Ubuntu\ 18.04.vdi > Ubuntu\ 18.04.gz
In this command we pipe the source Ubuntu 18.04.vdi file into gzip, specifying as output the Ubuntu 18.04.gz compressed file.
Once gzip finishes compressing your file, upload the .gz file to DigitalOcean, following instructions in the Custom Images Quickstart.
You should now be able to create and use Droplets from your custom Ubuntu 18.04 Server image.
Conclusion
In this tutorial, we learned how to create a custom VDI image from a vanilla Ubuntu 18.04 ISO using the VirtualBox virtualization tool. We adjusted cloud-init so it can properly configure Droplet networking on DigitalOcean, and finally compressed and uploaded the image using the Custom Images upload tool.
You can adjust the steps in this tutorial to work with your preferred Linux distribution’s ISO images. Ensure that you have an SSH server installed and configured to start on boot, and that cloud-init has been installed and properly configured to use the ConfigDrive datasource. Finally, ensure that any stale networking configuration files have been purged.
You may also wish to use a tool like Packer to automate the creation of your machine images.
To learn more about DigitalOcean Custom Images, consult the Custom Images product docs and launch blog post.


I absolutely love your blog and find nearly all of your post’s to be exactly I’m looking for.
Would you offer guest writers to write content for you personally?
I wouldn’t mind composing a post or elaborating on a few of the subjects you write
about here. Again, awesome website!
each time i used to read smaller content that as well
clear their motive, and that is also happening with this article which I am
reading here.
Woah! I’m really loving the template/theme of this website.
It’s simple, yet effective. A lot of times it’s very hard to get
that “perfect balance” between usability and visual appearance.
I must say you have done a very good job with this.
Additionally, the blog loads very fast for me on Chrome.
Outstanding Blog!
Hi, i believe that i noticed you visited my site so i came to return the desire?.I am trying to
find things to improve my web site!I assume its ok to make use of some of your ideas!!
Excellent blog you’ve got here.. It’s difficult to find high quality
writing like yours these days. I truly appreciate people like you!
Take care!!
Hi there! I know this is kind of off topic but I was wondering if you knew where I
could get a captcha plugin for my comment form?
I’m using the same blog platform as yours and I’m having difficulty finding
one? Thanks a lot!
Hi there! Quick question that’s completely off topic.
Do you know how to make your site mobile friendly? My blog looks weird when viewing from my apple iphone.
I’m trying to find a template or plugin that might be able to correct this
issue. If you have any recommendations, please share.
Many thanks!
Appreciate this post. Let me try it out.
Wow, that’s what I was exploring for, what a data!
existing here at this web site, thanks admin of this web page.
I’m gone to say to my little brother, that he should also pay a visit this blog on regular basis to get
updated from newest news.
An impressive share! I have just forwarded this onto a colleague who was doing a little homework on this.
And he in fact bought me lunch simply because I found it for him…
lol. So allow me to reword this…. Thanks for
the meal!! But yeah, thanks for spending time
to talk about this issue here on your internet site.
Yes! Finally something about ラブドール.
Excellent items from you, man. I have understand your stuff previous to and you
are simply extremely magnificent. I really like what you’ve received
here, certainly like what you’re stating and the way during which
you say it. You are making it entertaining and you
still care for to keep it sensible. I can’t wait to learn much more from you.
This is actually a terrific site.
What’s up all, here every person is sharing these know-how, thus it’s fastidious to read this weblog, and I used to pay a
visit this web site daily.
Thanks for such a great post and the review, I am totally impressed! Keep stuff like this coming.
I really enjoy reading and also appreciate your work.
Thanks for posting this info. I just want to let you know that I just check out your site and I find it very interesting and informative. I can’t wait to read lots of your posts.
Hello my family member! I want to say that this post is awesome,
nice written and include approximately all vital infos. I’d like to peer more posts like this .
What’s up Dear, are you in fact visiting this site regularly,
if so then you will absolutely get good experience.
It is perfect time to make some plans for the future and it is time to be happy. I’ve read this post and if I could I desire to suggest you some interesting things or suggestions. Perhaps you could write next articles referring to this article. I want to read more things about it!
Hey I know this is off topic but I was wondering if you
knew of any widgets I could add to my blog that automatically tweet my newest twitter
updates. I’ve been looking for a plug-in like this for quite some time and was hoping maybe you would have some experience with something like this.
Please let me know if you run into anything.
I truly enjoy reading your blog and I look forward
to your new updates.
I have read your excellent post. This is a great job. I have enjoyed reading your post first time. I want to say thanks for this post. Thank you…
Does your blog have a contact page? I’m having problems locating it but, I’d like to shoot you an e-mail.
I’ve got some creative ideas for your blog you might be
interested in hearing. Either way, great blog and I look forward to seeing
it grow over time.
Everything wrote was very logical. But, what about this?
what if you added a little content? I am not suggesting
your content is not solid., but suppose you added something that makes people desire
more? I mean How to Create a DigitalOcean Droplet from an Ubuntu ISO Format Image is a little boring.
You might look at Yahoo’s home page and watch how they create news titles to grab
people to open the links. You might add a video or a related picture or two to grab people interested about what you’ve got to
say. In my opinion, it might bring your posts a little livelier.
This is my first time visit at here and i
am actually impressed to read all at one place.
The other day, while I was at work, my sister stole my iPad and tested to see if it
can survive a twenty five foot drop, just so she can be a youtube sensation. My iPad is now destroyed and she has 83 views.
I know this is entirely off topic but I had to share it with someone!
I would also motivate just about every person to save this web page for any favorite assistance to assist posted the appearance.
These are in fact impressive ideas in regarding blogging.
You have touched some fastidious things here. Any way keep up wrinting.
Do you have a spam problem on this site; I also am
a blogger, and I was wondering your situation; we have created some nice procedures and we are looking to swap strategies
with other folks, why not shoot me an e-mail if interested.
Oh my goodness! Impressive article dude! Thank you so much,
However I am having difficulties with your RSS.
I don’t know the reason why I cannot subscribe to it.
Is there anyone else having similar RSS problems? Anybody who knows the answer will you kindly respond?
Thanx!!
I do not even know how I ended up here, but I thought this post was great.
I don’t know who you are but definitely you’re going to a famous blogger if you are
not already 😉 Cheers!
When I initially left a comment I seem to have clicked the
-Notify me when new comments are added- checkbox and from now on whenever a comment is added I receive four emails with the same
comment. Is there an easy method you can remove me from that
service? Appreciate it!
Wonderful blog! I found it while searching on Yahoo News.
Do you have any suggestions on how to get listed in Yahoo
News? I’ve been trying for a while but I never seem to get there!
Cheers
There’s definately a great deal to find out about this issue.
I love all the points you have made.
Incredible quest there. What occurred after?
Thanks!
Hey! This is my first comment here so I just wanted to give a quick shout out and say I truly enjoy reading through your posts.
Can you suggest any other blogs/websites/forums that go
over the same subjects? Thanks for your time!
Awesome! Its genuinely remarkable paragraph, I have
got much clear idea about from this paragraph.
Its such as you read my thoughts! You appear to grasp a lot about this, like you wrote the ebook in it or something.
I believe that you simply could do with a few p.c.
to drive the message home a little bit, however instead of
that, this is magnificent blog. A great read. I’ll certainly
be back.
I read this piece of writing completely on the topic of the comparison of most
up-to-date and previous technologies, it’s remarkable article.
Actually no matter if someone doesn’t know afterward its up to other people that they will help, so here
it occurs.
What a material of un-ambiguity and preserveness of precious familiarity regarding unexpected feelings.
Hi, all is going perfectly here and ofcourse every one is sharing
information, that’s truly good, keep up writing.
I every time spent my half an hour to read this webpage’s articles or reviews all
the time along with a cup of coffee.
Hey there, You have done an excellent job. I’ll certainly digg it and personally suggest to my friends.
I am sure they will be benefited from this web site.
I was wondering if you ever thought of changing the layout of your site?
Its very well written; I love what youve got to say.
But maybe you could a little more in the way of content so people could connect with
it better. Youve got an awful lot of text for only having 1 or 2 pictures.
Maybe you could space it out better?
whoah this blog is great i really like reading your articles.
Keep up the good work! You realize, lots of people are hunting round for this
information, you could aid them greatly.
Hi there, I enjoy reading through your article.
I like to write a little comment to support you.
Informative article, just what I needed.
Someone essentially assist to make severely articles I’d state.
This is the first time I frequented your web page and so far?
I amazed with the analysis you made to make this
actual publish extraordinary. Magnificent task!
I enjoy, result in I found exactly what I was looking for.
You have ended my four day long hunt! God Bless you man. Have a great
day. Bye
Excellent blog right here! Additionally your website lots up very fast!
What host are you the use of? Can I get your affiliate link on your host?
I want my web site loaded up as fast as yours lol
Good day! I just wish to offer you a big thumbs up for your
great info you’ve got here on this post. I’ll be returning to your website for more soon.
What’s up mates, pleasant paragraph and good arguments commented at
this place, I am really enjoying by these.
Very energetic blog, I loved that bit. Will there be a part 2?
It’s in reality a nice and helpful piece of information. I’m satisfied that you shared this useful info with us.
Please stay us informed like this. Thank you for sharing.
Greate article. Keep posting such kind of info on your site.
Im really impressed by your site.
Hey there, You have performed a fantastic job.
I will definitely digg it and for my part recommend to my friends.
I’m sure they’ll be benefited from this web site.
Very nice article. I absolutely appreciate this website. Keep it up!
What’s up mates, fastidious article and pleasant urging commented here, I
am genuinely enjoying by these.
Yes! Finally someone writes about sex education.
Great blog right here! Additionally your site rather a lot up very fast!
What web host are you using? Can I am getting your associate hyperlink to your host?
I wish my web site loaded up as fast as yours lol
It’s a shame you don’t have a donate button! I’d definitely donate
to this brilliant blog! I guess for now i’ll settle for book-marking and adding your RSS feed to my Google account.
I look forward to fresh updates and will share this
blog with my Facebook group. Chat soon!
Excellent items from you, man. I have take into account your stuff prior
to and you’re just too fantastic. I really like what you’ve bought here, certainly like what you’re stating
and the way in which in which you assert it. You’re making it
enjoyable and you continue to care for to stay it sensible.
I can not wait to learn much more from you. This is actually a wonderful web site.
There is certainly a lot to know about this topic. I really like
all the points you made.
Please let me know if you’re looking for a article writer
for your weblog. You have some really good posts and I believe I would be a good asset.
If you ever want to take some of the load off, I’d love to write some content for your blog in exchange for a link back to
mine. Please send me an e-mail if interested.
Thank you!
I am in fact happy to glance at this webpage posts which contains plenty of useful facts, thanks for providing these kinds of information.
I love what you guys tend to be up too. This kind of clever work and exposure!
Keep up the amazing works guys I’ve incorporated you guys to my personal blogroll.
Wow, incredible weblog layout! How long have you been running a blog for?
you made running a blog glance easy. The whole glance of your web site is magnificent, let alone the content!
I am sure this article has touched all the internet visitors, its really really nice article on building up new
website.
This article will assist the internet visitors for setting up new webpage or even a blog from start to end.
Hi, Neat post. There’s a problem with your website in web explorer, could test this?
IE nonetheless is the market chief and a huge component
to folks will omit your magnificent writing due to this
problem.
What’s up Dear, are you really visiting this web page
daily, if so afterward you will absolutely obtain nice
experience.
Hello are using WordPress for your blog platform? I’m
new to the blog world but I’m trying to get started and set
up my own. Do you need any html coding knowledge to make your own blog?
Any help would be really appreciated!
Greetings! Very useful advice in this particular article!
It is the little changes that will make the most significant changes.
Thanks for sharing!
Hey just wanted to give you a brief heads up and let you know a few of the pictures aren’t
loading properly. I’m not sure why but I think its a linking issue.
I’ve tried it in two different internet browsers and both show the same results.
Excellent way of describing, and pleasant article to
get data on the topic of my presentation subject matter, which
i am going to present in institution of higher education.
My spouse and I absolutely love your blog and find a lot of your post’s to be exactly what I’m looking
for. Do you offer guest writers to write content for yourself?
I wouldn’t mind publishing a post or elaborating on a few of the subjects you write regarding here.
Again, awesome weblog!
Definitely believe that which you said. Your favorite reason seemed to be on the net the easiest thing to be aware of.
I say to you, I certainly get annoyed while people
consider worries that they plainly do not know about.
You managed to hit the nail upon the top as well as defined out the whole thing without
having side effect , people can take a signal. Will likely be back to get
more. Thanks
I savour, cause I discovered just what I was taking a look for.
You’ve ended my 4 day long hunt! God Bless you man. Have a
great day. Bye
I all the time emailed this blog post page to all my associates, as if like to read it afterward
my contacts will too.
always i used to read smaller posts which as well clear their
motive, and that is also happening with this post which I am reading here.
Good information. Lucky me I found your website by accident (stumbleupon).
I have saved as a favorite for later!
Very good blog post. I definitely love this website.
Thanks!
Way cool! Some extremely valid points! I appreciate you writing this write-up and also the rest of the website is also really good.
I am really impressed with your writing skills as well as with the layout on your weblog.
Is this a paid theme or did you customize it yourself?
Anyway keep up the nice quality writing, it’s rare to see
a nice blog like this one today.
I quite like reading through a post that will make men and women think.
Also, thank you for permitting me to comment!
My family members always say that I am killing my time here at
web, except I know I am getting knowledge
daily by reading thes nice articles.
Amazing issues here. I’m very glad to peer your article.
Thank you a lot and I am taking a look ahead to touch you.
Will you kindly drop me a mail?
If you are going for finest contents like myself, just pay a visit this website
daily as it provides quality contents, thanks
Very descriptive post, I liked that bit. Will there be a part 2?
Great items from you, man. I’ve keep in mind your stuff previous to and you’re
simply too great. I actually like what you’ve bought here,
certainly like what you’re saying and the best way in which you assert it.
You’re making it enjoyable and you still take care of to stay it wise.
I can’t wait to read much more from you. That is actually a wonderful
website.
Aw, this was a very nice post. Spending some time and actual effort to produce a really good
article… but what can I say… I hesitate a whole lot and never seem to
get anything done.
Hi there it’s me, I am also visiting this web page
on a regular basis, this website is in fact nice and the visitors are genuinely
sharing pleasant thoughts.
I simply could not leave your site prior to suggesting that I really loved
the standard info an individual supply to your guests? Is going to be again incessantly to inspect new posts
Great work! That is the kind of info that should be shared around the net.
Disgrace on the search engines for now not positioning this publish higher!
Come on over and discuss with my web site . Thanks =)
We stumbled over here different website
and thought I should check things out. I like what I see so
now i am following you. Look forward to finding out about your web page again.
I am sure this piece of writing has touched all the internet viewers, its really really good post
on building up new blog.
This is very interesting, You’re a very skilled blogger. I have joined your feed and
look forward to seeking more of your great post. Also, I’ve
shared your website in my social networks!
It’s an amazing article designed for all the web visitors; they will
obtain benefit from it I am sure.
What i don’t realize is in reality how you are now not actually much
more neatly-preferred than you may be right now. You are so intelligent.
You recognize therefore significantly with regards to
this subject, produced me for my part consider
it from numerous various angles. Its like women and men aren’t involved except it
is one thing to accomplish with Woman gaga! Your own stuffs nice.
At all times care for it up!
Howdy would you mind sharing which blog platform you’re using?
I’m going to start my own blog in the near future but I’m having a hard time deciding between BlogEngine/Wordpress/B2evolution and Drupal.
The reason I ask is because your design and style seems different then most blogs
and I’m looking for something completely unique.
P.S Apologies for getting off-topic but I had to ask!
Thank you for the auspicious writeup. It in fact
was a amusement account it. Look advanced to more added
agreeable from you! However, how could we communicate?
Thanks for sharing your thoughts. I really appreciate your efforts and I will
be waiting for your next write ups thank you once again.
Its like you read my mind! You appear to know a lot about this, like you wrote the
book in it or something. I think that you
could do with a few pics to drive the message home a little bit, but other than that,
this is magnificent blog. A great read. I’ll definitely be back.
Thanks for a marvelous posting! I definitely enjoyed reading it, you might be a
great author.I will make sure to bookmark your blog and definitely will come back someday.
I want to encourage you continue your great posts, have a nice evening!
Wonderful blog! I found it while browsing on Yahoo News.
Do you have any tips on how to get listed in Yahoo News?
I’ve been trying for a while but I never seem to get there!
Many thanks
I’m curious to find out what blog platform you’re utilizing?
I’m experiencing some small security problems with my latest
blog and I’d like to find something more secure. Do you have any
suggestions?
Awesome post.
It’s appropriate time to make some plans for the long run and it is time to be happy.
I’ve read this publish and if I could I wish to counsel you
few interesting issues or advice. Perhaps you can write
subsequent articles relating to this article.
I want to read even more issues approximately it!
I read this article completely about the resemblance of newest and earlier technologies,
it’s amazing article.
Excellent article! We are linking to this great
post on our website. Keep up the good writing.
Great post. I used to be checking constantly this blog
and I’m impressed! Very helpful information specially the final section :
) I take care of such information a lot. I used to be seeking
this particular info for a very long time.
Thanks and good luck.
I was curious if you ever considered changing
the layout of your website? Its very well written; I love what youve got to say.
But maybe you could a little more in the way of content so people could connect with it better.
Youve got an awful lot of text for only having 1 or two images.
Maybe you could space it out better?
Having read this I thought it was rather enlightening. I appreciate you finding the time and energy to put this article together.
I once again find myself spending a significant amount of time both reading and posting comments.
But so what, it was still worthwhile!